MRF Blender Integration
This page presents the **MRF** Blender integration for version 2.8x. For version 2.7x and older, please refer to the Blender 2.7x page.
With MRF Blender Bridge, you can directly export and render your scenes from Blender (cf. Figure ).
*****************************************
* .---------. .-----. .-------. *
* | Blender +-+->| MRF +-+->| Malia | *
* '---------' '-----' '-------' *
*****************************************
This permits to build quickly of a scene and enables easy camera setup.
Blender can be downloaded from: Blender.org
A Blender scene is exported to a MRF scene which is a combination of:
- a .msf file: the scene,
- a .mcf file: the camera(s)
- an optionnal .mpf file: the patch (see [MRF Patch mechanism](./blender_integration.md.html/#howtousethemrfintegration/mrfpatchmechanism))
- a directory containing the assets (.obj, envmaps, .spd ...)
Then we can either use Malia to render the MRF scene or call Malia directly from Blender using its interactive mode of offline mode.
If SpectralViewer is available it can also be used to open the rendered image.
# Download
You can pick the relevant Blender plugin depending on your platform. (Kepler builds coming soon).
| NVIDIA Card | Windows | Linux |
| ------------ | ------------------------------------------------------------------------------------------------------------------ | ------------------------------------------------------------------------------------------------------------------------- |
| >= Maxwell | [Blender bridge](https://gitlab.com/mrf-devteam/mrf/-/jobs/artifacts/master/raw/blender_mrf.zip?job=malia_win10) | [Blender bridge](https://gitlab.com/mrf-devteam/mrf/-/jobs/artifacts/master/raw/blender_mrf.zip?job=malia_ubuntu_18_04) |
# Installation
The Blender bridge can only be installed as a Blender plugin.
Follow the instructions below to install it:
- Start Blender
- Go to Edit -> Preferences -> Add-Ons

- Enable the plugin in Blender

- The MRF Panel should be available on the right side with the other panels

# Usage
The control panel is composed of three panels where options can be set:
* Import panel section
* Export panel section
* Render panel section
### Import panel
This panel let you specify a folder where .spd files for IOR and light SPD will be looked for when exporting spectral data.
### Export panel
The export component allows you to convert your Blender project in a MRF compatible scene. It has four options:
- **Export camera**: checked by default, it allows you to disabled the camera export, in case you do not want your camera file to be overwritten.
- **Export camera animation**: enables the export of an animation a sequence of camera, the camera file will thus contained as many cameras as there are frames in your animation.
- **Fast Export (no geom.)**: disables the export of geometry files (.obj), only the scene (and camera if not disabled) file is exported. Materials, being part of the scene, are still exported.
- **Use ply**: allows you to export the geometry as .ply instead of .obj. Materials are not affected.
If you only want to export the scene, you can use the **export** button at the bottom of this component.
The exported scene can be found in the same directory than your blender scene under the same name (only the extension differs).
### Render Panel
The render component allows you to launch a render with Malia (if installed), directly from Blender. It has
- **Max path length**: the maximum ligth path length that should be processed. This parameter is necessay for Malia with OptiX as there is no use of russian roulette.
- **Spectral rendering**: allows you to choose if you want to render the scene in spectral or RGB. It has no impact on the export, we always export both spectral and RGB data. (If you have rgb2spec in MRF_DIR/bin).
- **First wavelength**: the first wavelength to use for spectral rendering.
- **Last wavelength**: the last wavelength to use for spectral rendering.
- **Step wavelength**: the step between wavelengths to use for spectral rendering. It determines the number of wavelengths that will be processed (#wavelengths = (last - first) / step).
- **Wavelengths per pass**: the number of wavelengths processed at once (per ray). Note that in Malia, one sample always corresponds to all the wavelengths, which can be processed one by one, or multiplexed.
- **Interactive rendering**: checked by default, it allows you to use the interactive renderer. Note that the interactive renderer will open a dedicated window. The non-interactive one will show its advancement in the Blender console.
- **Samples**: the number of samples required to compute the image, if not renderer is not interactive.
- **Open viewer after render**: if checked and if renderer is not interactive, the rendered image will be directly open with SpectralViewer. Note that this option freezes the Blender UI until the rendering is completed.
If you want to render the scene while you have not exported it yet, use the **export and render** button. Otherwise, use the **render** button to launch Malia with your scene and the chosen options.
!!! WARNING
If you click on the render button before exporting the scene, Malia will be launched in interactive mode with no scene.
# Scene Export Mechanism
## Material Export
The following materials are currently supported by the export from Blender to MRF.
!!! Warning
Note that the export of textured materials from blender is very limited. More support will be added in a future version.
The following table shows the MRF equivalent of Blender materials, depending on specific parameters.
The last three columns of the table shows you their support in the Malia OptiX-based renderer as well as their cuda implementation.
Blender | Specific Parameters | MRF (c++) | Malia (RGB) | Malia (Spectral) | OptiX backend cuda file
----------------|------------------------------|----------------|--------------|------------------|------------------------
Diffuse BSDF | | Lambert | YES | YES | lambert.cu
Diffuse BSDF | Color: CheckerTexture | Checkerboard | YES | YES | lambert.cu
Glossy BSDF | Distribution: Sharp | FresnelMirror | YES | YES | microfacet_conductor.cu
Glossy BSDF | | GGX | YES | YES | microfacet_conductor.cu
Glass BSDF | Distribution: Sharp | FresnelGlass | YES | YES | microfacet_dielectric.cu
Glass BSDF | | WalterBSDF | YES | YES | microfacet_dielectric.cu
Mix Shader | Diffuse + Glossy BSDF | PhongNormalized| YES | YES | phong.cu
Principled BSDF | | Principled | YES | YES | principled.cu
!!! Warning
Malia's Principled BSDF implementation only handle parameters listed in [Burley12].
!!! Tip
Note that some MRF materials require to have a specific name in Blender to be exported as they do not have any direct equivalent in Blender.
In that case, any Blender material case be used as long as it has this specific name.
The following table lists the name to be used for MRF specific materials.
Blender material name | MRF (c++) | Malia (RGB) | Malia (Spectral) | OptiX backend cuda file
----------------------|---------------|--------------|------------------|-------------------------
MRF_Normal | Normal | YES | NO | debug_shader.cu
MRF_Tangent | Tangent | YES | NO | debug_shader.cu
MRF_UV | UV | YES | NO | debug_shader.cu
MRF_Flat | Flat | YES | NO | debug_shader.cu
MRF_ShadowCatcher | ShadowCatcher | YES | YES | debug_shader.cu
## Light Sources Export
The following types of light sources are currently exported from Blender to MRF:
Blender Light source | MRF (.msf) | MRF (c++)
-------------------------|---------------|-------------------------
Area | area_light | QuadLight
Point | sphere_light | SphereLight
Sun | dir_light | DirectionalLight
!!! Tip
The **radius** of a MRF Sphere light can be controlled using the **Size** parameter of a Point Light in blender, see the image below.
 !!! WARNING
Export from Blender spot lights is currently not supported in Malia.
## Materials/Light sources with Spectral data
We currently support two mechanisms to export material spectral data from blender:
- Conversion (from blender RGB value)
- Import from a file (.spd) describing the spectral power distribution.
The conversion is done by [rgb2spec](../doc/apps/rgb2spec/rgb2spec.md.html), which is provided with the blender bridge.
Importing a .spd for a material/light source will disabled the conversion from blender RGB to spectral data for that material/light source.
To import a .spd as spectral data, you have to set a specific value to the name of the material/light source.
The name must start with MRF_ followed by a relative path to the .spd file.
This relative path is relative to different sub folders in the MRF_DIR folder depanding on the material type or light source.
The table below shows the different subfolders where the exporter will look to find the .spd you want to export.
Blender Material/Light source type | Folder
-----------------------------------|-------------------------------
Any light source | MRF_DIR/assets/light_sources
Diffuse Material | MRF_DIR/data/lambert
Glossy Material | MRF_DIR/assets/refractive_index/data
Glass material | MRF_DIR/assets/refractive_index/data/
Measured Isotropic | MRF_DIR/assets/measured_materials/
!!! WARNING
An exception for this rule is made for the Measured Isotropic material, has it do not have any Blender Cycles equivalent, to export
it from blender, is name must start with MRF_measured_isotropic_
!!! Tip
The blender file MRF_DIR/assets/scenes/material_export.blend shows some examples of material export.
## MRF patch mechanism
Alongside we all the authoring options in blender for a mrf scene presented in the previous sections, another mechanism is available.
The patch mechanism, it consists of a .mpf file that you can put alongside your .msf.
Using the python script patch_mrf_scene.py (that you can find in MRF_DIR/tools), you can replace some nodes of you .msf scene file.
This is particularly usefull to replace some nodes that cannot be exported from blender, for instance a PhongNormalized material (see [material section](./scene_format.md.html#materials)).
Calling this script patch_mrf_scene.py will replace the nodes of your .msf scene file by the ones present in the .mpf patch if they have the same name and type.
!!! WARNING
Export from Blender spot lights is currently not supported in Malia.
## Materials/Light sources with Spectral data
We currently support two mechanisms to export material spectral data from blender:
- Conversion (from blender RGB value)
- Import from a file (.spd) describing the spectral power distribution.
The conversion is done by [rgb2spec](../doc/apps/rgb2spec/rgb2spec.md.html), which is provided with the blender bridge.
Importing a .spd for a material/light source will disabled the conversion from blender RGB to spectral data for that material/light source.
To import a .spd as spectral data, you have to set a specific value to the name of the material/light source.
The name must start with MRF_ followed by a relative path to the .spd file.
This relative path is relative to different sub folders in the MRF_DIR folder depanding on the material type or light source.
The table below shows the different subfolders where the exporter will look to find the .spd you want to export.
Blender Material/Light source type | Folder
-----------------------------------|-------------------------------
Any light source | MRF_DIR/assets/light_sources
Diffuse Material | MRF_DIR/data/lambert
Glossy Material | MRF_DIR/assets/refractive_index/data
Glass material | MRF_DIR/assets/refractive_index/data/
Measured Isotropic | MRF_DIR/assets/measured_materials/
!!! WARNING
An exception for this rule is made for the Measured Isotropic material, has it do not have any Blender Cycles equivalent, to export
it from blender, is name must start with MRF_measured_isotropic_
!!! Tip
The blender file MRF_DIR/assets/scenes/material_export.blend shows some examples of material export.
## MRF patch mechanism
Alongside we all the authoring options in blender for a mrf scene presented in the previous sections, another mechanism is available.
The patch mechanism, it consists of a .mpf file that you can put alongside your .msf.
Using the python script patch_mrf_scene.py (that you can find in MRF_DIR/tools), you can replace some nodes of you .msf scene file.
This is particularly usefull to replace some nodes that cannot be exported from blender, for instance a PhongNormalized material (see [material section](./scene_format.md.html#materials)).
Calling this script patch_mrf_scene.py will replace the nodes of your .msf scene file by the ones present in the .mpf patch if they have the same name and type.
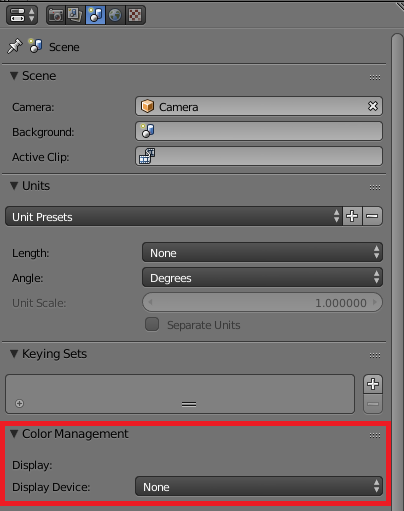
Not all nodes are supported by this mechanism. Here are the currently supported nodes in a .mpf: - background - ext_resources - emittance (emittance nodes contained in the materials node and emittance nodes contained in a light node) - material !!! Tip When you export a scene from blender using the mrf integration, if a .mpf patch with the same name than your scene is present in the destination folder, the patch will be automatically applied at the end of the export. !!! Tip See the material_export.msf in MRF_DIR/assets.scenes for an example of this mechanism. # Matching Blender Cycles renderings with MRF To compare ouptut images from Blender Cycles and MRF, you need to adjust the color management in Blender. Go to Scene -> Color Management -> Display device, set the value to None (default is sRGB). Once you have done that, the MRF render engine output should match Blender Cycles output.
 # Limitations of the Blender Bridge
The integration with Blender remains minimal; desired improvements include:
- Shading network conversion: our current approach is to take the first shader in the network, which limits material complexity;
- Full scene graph: the scene graph from Blender is simply flattened for now, which is sufficient for rendering in practice;
- Direct access to Blender memory: the Blender scene is currently converted to a .msf file, which hinders performance;
- Dynamic scenes: the only motion that we take into account is that of the camera.
Some of these limitations can be alleviated by the use of python scripts that work on the .msf file.
For instance, textured objects can be obtained by replacing one material in the scene by a MRF Phong model, which handles texturing.
Geometric instances may also be declared in this way.
However, these are only workarounds, and better solutions should be found in the future.
# Limitations of the Blender Bridge
The integration with Blender remains minimal; desired improvements include:
- Shading network conversion: our current approach is to take the first shader in the network, which limits material complexity;
- Full scene graph: the scene graph from Blender is simply flattened for now, which is sufficient for rendering in practice;
- Direct access to Blender memory: the Blender scene is currently converted to a .msf file, which hinders performance;
- Dynamic scenes: the only motion that we take into account is that of the camera.
Some of these limitations can be alleviated by the use of python scripts that work on the .msf file.
For instance, textured objects can be obtained by replacing one material in the scene by a MRF Phong model, which handles texturing.
Geometric instances may also be declared in this way.
However, these are only workarounds, and better solutions should be found in the future.